A few months ago Amazon had some digital scrapbooking software as daily deal for $1.99. So since I have been considering dabbling in that I picked it up. Yes I could just use Photoshop but honestly this software makes it much easier to organize all of your "papers" and "embellishments" and such. I hadn't really had a chance to do a page with it yet so I decided to tackle that tonight. This is my first digital scrapbook design using the software. It's not the same as using real paper and other products but I can see the appeal.
Tuesday, September 11, 2012
Lacy Day 3: Sim Card Earrings
Today I was digging around in my jewelry-making craft bin, looking for some beads to make a charm to go on my still unfinished doggie keychain and ran across a couple of SIM cards I'd saved to make earrings out of. Well, no time like the present! I punched a hole in the top of each and made some little charm connectors out of some spare Swarovski crystals I had. Et voila!
Monday, September 10, 2012
Lacy Day 2: Doggie Keychain
While cruising Pinterest earlier today, I ran across a pair of adorable earrings that were glazed photos of a kitten's head that someone was selling on Etsy. I checked out the store and saw a big-headed doggie charm and thought it would be adorable to make one of my little doggie, Bart, who is a Jack Russel / Beagle mix. I corralled him into the backyard and bribed him with his favorite squeaky toy to get a good pic of him. Then I cajoled my husband into stopping in at the craft store to pick up some Mod Podge Dimensional Magic which I'd never used before but have been wanting to try out.

After dinner I sat down in Photoshop and touched up Bart's eyes. I didn't go for the cartoony big eyed look but I did make his head bigger. I printed out two parts, a tiny body and a big head, on cardstock at about 2" tall for a keychain and cut them out. Turns out my photo printer kind of sucks and the print quality wasn't all that good, and I probably should have done some color correcting to remove a bit of the blue from the print, but I got lazy.
I sealed the prints with hairspray so the mod podge wouldn't cause the ink to bleed and let the pieces dry. When I went to coat the pieces with the Mod Podge, I wasn't sure what to expect, but it's some seriously cool stuff. I found that it doesn't run off the edge even of a thin piece of paper as it holds it's surface tension really, really well. If you do happen to get a bubble, simply touch it with a fingertip and it'll come right off on your finger which is a much better place for it than in the center of your project. Failing that, push it to the edge of your shape and draw it off the side. I used the tip of my scissors for this and it worked well, just be careful not to make break the surface tension on the glaze or it will spill off onto your work surface and then you have a problem on your hands.
I'll let the pieces dry overnight, coat the back tomorrow morning, and punch a hole to attach to my keychain and take some pics. I'm afraid the color won't be very nice due to the low quality of the print. Maybe I'll try it again on photo paper tomorrow and see if the image turns out better.
Update from Tuesday morning: I woke up to find that the dimensional magic glaze dried really well, but I had some issues with the method of sealing the ink. I don't think I got enough coats of hair spray. My inks ran and the paper curled a bit. I actually cracked the glaze trying to straighten it out, so I sat this morning and cut out another doggie and decided to try a different method to seal the ink. I'm sure it helps that the print has sat overnight and isn't fresh off the printer, too, but this time I used several coats of clear nails laquer before applying the glaze. I figured the nail glaze would keep the paper stiffer than hairspray so I won't have the warping issue. I'll let it dry today and flip it over and coat the back later and come back for an update.
Update from Tuesday afternoon: Front is completely dry and I'm really happy with the color. No bleeding and everything looks really nice and clear with minimal warping. When I went to flip the pieces over to coat the backs, I had gotten the body piece caught on the paper I had them drying on, so there's a bit of print under the glaze on the back, but meh. It's the back, so who cares. I'm going over to the in-law's for dinner, so when I get home, I'll punch a hole and stick the keyring on. I might even make a little dangling charm to go with it. We'll see.
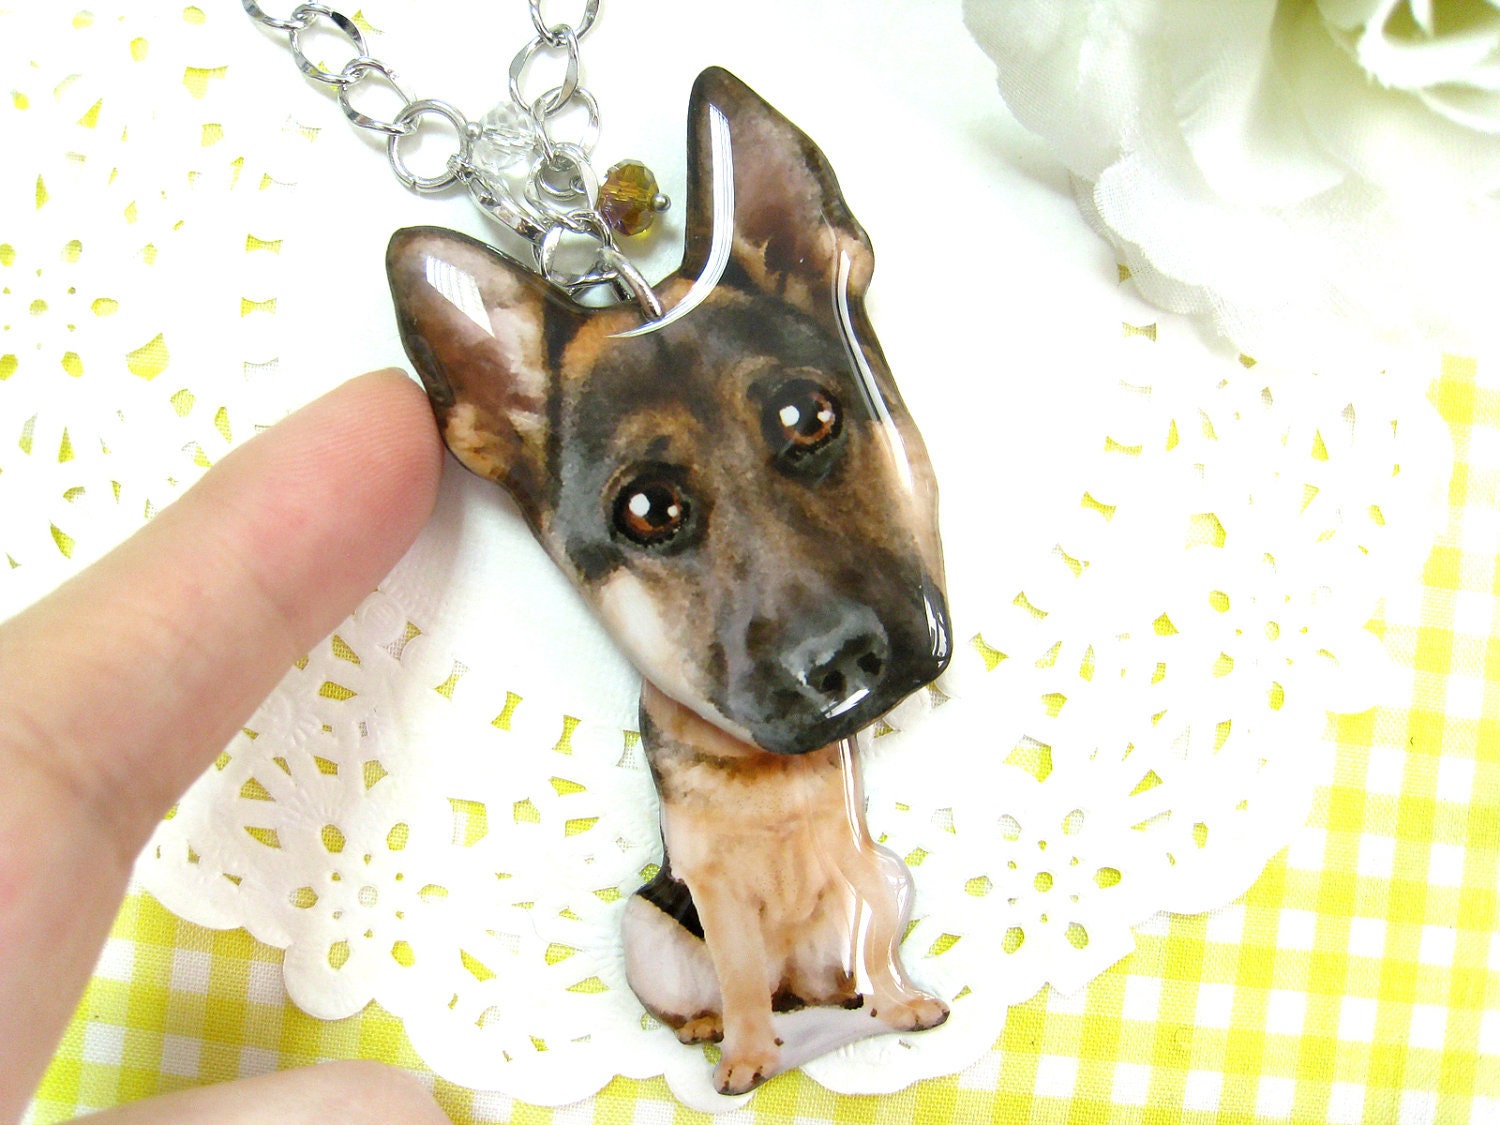
Update from Tuesday night: The glaze on the back dried really well and it took no time at all to punch a hole and insert my keyring. There are some minor defects that if I were going to gift this, I'd want a do over to fix, but overall I'm happy with it. For one, I broke the surface tension while waiting for the back of the doggie's head to dry by sticking my stupid finger in the glaze accidentally. This caused the glaze to slip under the ears and glue the piece down to my work surface. As a result, I had to pry the piece up and there are some dull spots on the ears that are a bit unsightly. Also, you'll see some blue streaks in the body of the larger keyring in the pics below. This is where I didn't get a good enough coat of nail laquer under the mod podge and the ink leached. I'll be careful about that if I ever attempt a project like this again. And also, I hear that if you take really hot water, you can dissolve the glaze, so that might be a way to smooth out the dull spots on the ears, but I'd be too afraid I'd get the ink wet if I weren't careful as the edges aren't totally sealed in. And then his little head would be ruined for sure. In any event, I may make a third attempt to achieve perfection at some point.
In the pic of the finished item below, you'll also see the smaller doggie that was a fail from yesterday.

After dinner I sat down in Photoshop and touched up Bart's eyes. I didn't go for the cartoony big eyed look but I did make his head bigger. I printed out two parts, a tiny body and a big head, on cardstock at about 2" tall for a keychain and cut them out. Turns out my photo printer kind of sucks and the print quality wasn't all that good, and I probably should have done some color correcting to remove a bit of the blue from the print, but I got lazy.
I sealed the prints with hairspray so the mod podge wouldn't cause the ink to bleed and let the pieces dry. When I went to coat the pieces with the Mod Podge, I wasn't sure what to expect, but it's some seriously cool stuff. I found that it doesn't run off the edge even of a thin piece of paper as it holds it's surface tension really, really well. If you do happen to get a bubble, simply touch it with a fingertip and it'll come right off on your finger which is a much better place for it than in the center of your project. Failing that, push it to the edge of your shape and draw it off the side. I used the tip of my scissors for this and it worked well, just be careful not to make break the surface tension on the glaze or it will spill off onto your work surface and then you have a problem on your hands.
I'll let the pieces dry overnight, coat the back tomorrow morning, and punch a hole to attach to my keychain and take some pics. I'm afraid the color won't be very nice due to the low quality of the print. Maybe I'll try it again on photo paper tomorrow and see if the image turns out better.
Update from Tuesday morning: I woke up to find that the dimensional magic glaze dried really well, but I had some issues with the method of sealing the ink. I don't think I got enough coats of hair spray. My inks ran and the paper curled a bit. I actually cracked the glaze trying to straighten it out, so I sat this morning and cut out another doggie and decided to try a different method to seal the ink. I'm sure it helps that the print has sat overnight and isn't fresh off the printer, too, but this time I used several coats of clear nails laquer before applying the glaze. I figured the nail glaze would keep the paper stiffer than hairspray so I won't have the warping issue. I'll let it dry today and flip it over and coat the back later and come back for an update.
Update from Tuesday afternoon: Front is completely dry and I'm really happy with the color. No bleeding and everything looks really nice and clear with minimal warping. When I went to flip the pieces over to coat the backs, I had gotten the body piece caught on the paper I had them drying on, so there's a bit of print under the glaze on the back, but meh. It's the back, so who cares. I'm going over to the in-law's for dinner, so when I get home, I'll punch a hole and stick the keyring on. I might even make a little dangling charm to go with it. We'll see.
In the pic of the finished item below, you'll also see the smaller doggie that was a fail from yesterday.
Day 2 Blast off!
Today I finally managed to finish up a scrapbook page that I started probably 5 months ago. I really need to get on Henry's pages. He only has maybe 3 or 4 done for his book. I would like to embellish this page a little more but I haven't thought of just the right thing, maybe some trains cut with the Silhouette since he is holding a toy train.
I also did a creative project with Charlie that he was super excited about. We made a little rocket ship from a toilet paper roll and it turned out pretty cute.
Day 1: A Doodle
When I mentioned this idea to Lacy my goals were pretty simple: Spend a mere 10 or 15 minutes a day at least on doing something creative. This could be anything from taking the time to snap a few photos, journaling, scrap booking, sewing, doodling or whatever is even remotely related to a creative project even just laying out the stuff I need to get started on something the next day. Sounds easy enough right? Well for me it hasn't been. I am a stay-at-home mom with a 3 year old and 19 month old boys with a third boy due December 1. I also work at home 15-20 hours a week as a graphic designer for the Harrison County Convention and Visitors Bureau. As you can imagine my days stay pretty busy child rearing, working, and trying to keep up with dishes, diapers, and toys. The routine of things has started to wear on me some lately and I am hoping that adding a little bit of "me" time through creativity back into the mix that I might not feel so crazed all the time.
My first day was a busy one but I managed a little doodling which is actually something I want to do more of. I found this awesome book that I intend to purchase next week. I think the doodling could go a long way in my scrap booking and my Smash Journal. Sunday, September 9, 2012
Lacy Day 1: Shrinky Dinks
Today is the first day of a creativity challenge that my friend April and I have made for ourselves. I am an expecting mom who is planning on staying home to care for our child (due any day now) and need something constructive to do to fill my days since I'm used to working full time and go a little stir crazy when left to my own devices. I joked that instead of a 100 day creativity challenge, I should do a 100 day cleaning challenge instead, but maybe that'll be my next goal.
Today I chose to do a project making some necklace pendants out of #6 recyclable plastic, an idea I got from a tutorial on Pinterest (where else?)
I saved up a few deli containers from buying farewell cookies for my coworkers last week and could kick myself for tossing out the strawberry container I used this morning. Sigh. Alas, pregnancy brain. I cruised through my jewelry pinboard to get some ideas of things I would find cute enough to wear and came up with a name pendant that I'll later layer with a footprint when the baby comes, a fishbowl, my state and a caged bird.
I sat down in Illustrator and sketched out my designs intending to print them to paper and trace on top of the transparent plastic, but I came up with a better idea. I've previously had great luck feeding plastic through my trusty old Brother laserjet printer (the kind that you find in an office that uses toner, NOT ink) so I took my roughly 6" x 5" sheet of plastic I'd cut out of the top of my food container and put it in the manual feed tray and crowded my art onto the top left of my page. Low and behold, it worked! So, if you have a laserjet printer, give it a try, but don't forget to flop your image so that the "shiny" side of your pendant will face outward and be less likely to get scratched. In Illustrator, choose Output in the print setting dialog and make sure to set the Emulsion setting to "Down (Right Reading)" or manually flop your art using the command Object > Reflect > Vertical before you print. Many consumer printers also have a built in flop option in their print dialog for t-shirt transfers, so I'm sure this step won't pose too much difficulty if you're not using Illustrator.
Some notes on my vector drawing skills: Don't be too impressed. I already had the fish, bird, and state outlines from another project, and I downloaded them from the net and didn't draw them myself. The heart, fishbowl, and cage were easy peasy using simple shapes and the pathfinder palette, the reflect tool to keep things symmetrical, and blended shapes.
I have found that the toner bakes into the finished product really well and will not scratch off, but the colors laid down with a Sharpie will scratch off easily, so if you're adding color, definitely lay a coat of varnish, clear nail polish, or mod podge on the back of your pendant to protect it against wear.
The next few steps were simple. I cut out the pieces and colored in the areas that I wanted to have a little pop with colored Sharpies. I used a 3/8th inch standard hole punch to make a hole at the top of each piece, and used the broad side of my scissors to scratch any of the outline of my cut marks off of the edges of the pieces so the black line would disappear. I had read on another tutorial to expect a 2" object to shrink to .75", so I worked out the ratios and figured that if I wanted my pendants to be 1.5" long, then I would need to size the artwork to print at 3". This ratio was spot on when baking at 250 degrees. However, I can say from the experimentation that I did that if you turn the heat up to say 400 degrees, you will get a significantly smaller finished piece.
So, the pieces that I baked tonight did not turn out very well. They stuck to the tin foil I used as a pan liner and all ended up with little dimples in the centers where they curled around themselves. So I tried again and used a metal spatula to flatten out the pieces when they started to curl. This was a bad idea as the print and shape warped massively when I pressed the pieces down. So, don't do that. Probably just use parchment paper as that seemed to work for the other pinners.
You can see from the pics I've loaded below the dimples and warping in the baked pieces as well as the size differences between the baked and unbaked pieces. The smallest Collin piece may end up being useful. The others are trash. I'll have to step out to the bakery tomorrow and pick up some more goodies so I can use the containers to try to get the rest of them right. I've got plenty of jump beads laying around needing uses, but not many chains, so perhaps a trip to the craft store is in order, also. After all, I have to keep myself busy while I'm waiting on this baby to arrive. I'll be 9 days past due tomorrow and I'm about to lose my mind!
Subscribe to:
Posts (Atom)


