
Sunday, September 30, 2012
Lacy Day 22: Felt Bows
I intend to make a few adorable ribbon clips for a friend's baby girl's upcoming first birthday, but despite having an entire box full of ribbon, I didn't have anything on hand that would be a suitable color and thickness, so I looked up a felt ribbon tutorial and whipped up a couple in some magenta felt that I already had. I think they're cute, but they're really tiny. I neglected to take into consideration how big the clip would be, so I'll likely end up redoing them or using them as present wrapping or something. Or maybe putting grabby velcro on them and gifting them to someone having an infant girl.

April Day 22: Helping out
Today I helped Leslie put together a Baby Shower card for a friend. You'll just have to take my word for it though because I didn't snap a photo this time. It had a great little giraffe on it that I made with the Cricut.
Saturday, September 29, 2012
Lacy Day 21: RAM Upgrade
Upgraded my older iMac with the max RAM it can handle. Doubled my RAM from 2GB to 4GB, and it's faster at 667 MHz. Should have significantly better performance when running CS6 now, which I am very stoked about. I should have done this ages ago since I ordered the RAM ages ago, but I thought it required major Mac surgery involving removing the screen. Turns out there's just a little panel at the bottom of the case and ONE screw to undo. Sigh. That's what I get for not looking up the instructions earlier.

April Day 21: And they're off!


Friday, September 28, 2012
Lacy Day 20: Breakfast Sandwiches
 How about a kitchen adventure for today's project?
When I was working, I had been in the habit of eating breakfast at my desk. Usually oatmeal or a granola bar. Now that I'm home, I have a very bad habit of skipping breakfast or not getting around to eating it until lunchtime. This is a very bad habit if you're breastfeeding, so I decided to make some breakfast sandwiches to stick in the freezer so I can nuke them and chow down first thing in the morning.
I toasted whole wheat English muffins on a baking sheet in the oven while cooking my Egg Beaters in muffin tins on the bottom rack. I took a cue from Pinterest and put them in the 350-degree oven for 15 minutes. They turned out perfectly round and popped out of my silicone muffin tins with ease. I used provolone cheese this time, but maybe next time I will get some asiago and whip up some hollandaise sauce to try to emulate Wendy's Artisan Egg Sandwich.
I would estimate that the entire process took somewhere between a half an hour and 45 minutes. The bulk of that was waiting around on the oven timer. The most labor-intensive part was wrapping the sandwiches in shrink wrap.
April Day 20: Rabbits are Very Prolific

Thursday, September 27, 2012
April Day 19:Cut and paste

I have been needing to make several Thank You cards. I cut out the parts for them a few days ago and finally got around to gluing one together today. I also helped Charlie make 2 fall trees - 1 to hang on the fridge and one for Daddy to take to work.
Lacy Day 19: Wallet Photos
 I printed out some photos for my husband to keep in his wallet. He asked for them, which is slightly odd since "analog" photos are really old-school for him. He's so techy, I figured he'd just show people pics on his phone. But I was only too happy to oblige. I made two copies of each since I promised my dad we'd bring him some pics when we go up to visit this weekend.
 This marks the first time I'd ever used Adobe Bridge for anything. I was printing on 4" x 6" photo paper and wanted to tile a 2" x 3" image and didn't feel like doing to setup manually, so I googled it and found out that Bridge will do the proofing setup for you but won't actually print it. It will, however, save a PDF that you can then print. Kind of a roundabout way of doing it, but it worked.
(Didn't I say something about not making this blog into a baby photo bomb? Well, at least I'm posting pictures of things I've done with the photos I've taken and not just straight up photos of the baby, right?)
Wednesday, September 26, 2012
Lacy Day 18: Birth Announcements
Today I sent the baby announcements off to the printers. I did the layout and typesetting weeks ago before the baby came, but I took the photo today and edited it. My Mac is in serious need of a RAM upgrade. I have the max RAM that the computer will take sitting here on my desk, I just haven't installed it yet. This project would have gone much, much smoother if I didn't have to wait on my machine to catch up with me. Here are the front and back of the cards I'll be sending out soon.


 I pulled the changing table over to the window where the light was better and took the photo. After I put him down for his nap, I color corrected in PhotoShop and airbrushed out the rail of the changing table and some minor blemishes. Then I added some selective blur and desaturated the image a lot. I was going to use it as a black and white, but my husband didn't like the look of it, so I left a little color in. I think it turned out pretty well, though I was rushed and may have cropped the image differently, adjusted the opacity of the "ribbons", and tweaked the blue in the cabuchon if given time to work on it. Here's the finished image side by side with the unedited version in case anyone was overly impressed with my poor photography skills.


 I pulled the changing table over to the window where the light was better and took the photo. After I put him down for his nap, I color corrected in PhotoShop and airbrushed out the rail of the changing table and some minor blemishes. Then I added some selective blur and desaturated the image a lot. I was going to use it as a black and white, but my husband didn't like the look of it, so I left a little color in. I think it turned out pretty well, though I was rushed and may have cropped the image differently, adjusted the opacity of the "ribbons", and tweaked the blue in the cabuchon if given time to work on it. Here's the finished image side by side with the unedited version in case anyone was overly impressed with my poor photography skills.
 April Day 18: Stylized trees

Tuesday, September 25, 2012
April Day 17: grrrr!!!!!!

Lacy Day 17: Memory Book
I worked on filling in some of the pages of the baby's memory book. It's nothing special, just one of those fill in the blank type thingies with empty pages to paste in pics and mementos.


Monday, September 24, 2012
Lacy Day 16: Baby Photo Pendant
I made a little charm up last night between feedings. I'd found a blank jewelry finding I'd scavenged from somewhere in my jewelry craftbox, so it was just a matter of sizing down a baby photo, cutting it out, gluing it on and following the same Mod Podge Dimensional Magic procedure with the nail polish as I did with the keychain I made weeks ago. My how time flies when you have a newborn! I have a lot of days to make up on, and I'll get to it soon. I feel like taking little breaks to do something creative might just keep me sane.


Sunday, September 23, 2012
April Day 15:Thank You cards

Saturday, September 22, 2012
April Day 14: More Rabbit Boys

Friday, September 21, 2012
April Day 13: Tootsie Pop

Thursday, September 20, 2012
April Day 12

Wednesday, September 19, 2012
April Day 11:Paper and ideas
OK so I have a couple of things going on today.
 First I worked on finding and coordinating some scrapbook papers for last years Halloween photos. A couple of weeks ago I scored 2 awesome autumn/Halloween 180 count paper stacks at Joann's Fabrics (compliments of my hubby) so I figure I need to put them to use. Picking out the paper is half the battle when it comes to scrapbooking.


 |
| The Samsonite case |

Second is a project I am thinking about doing. I saw this great photo on Pinterest where someone had taken a vintage suitcase and turned it into a craft organizer. It just so happens I have two great suitcases in the basement just sitting there looking lonely, waiting to be put to good use. One is an aqua blue with white trim and the other is a brown leather Samsonite which is huge. I was thinking of converting one to what would be my portable craft organizer. Of course that means I need a reason to go and craft somewhere else but that can wait. I'm not sure where to start with this really.
Tuesday, September 18, 2012
April Day 10: Monsters...Cute ones
I keep seeing examples of adorable little doodled monsters or monster rubber
stamps and have been wanting to doodle and color some myself. They are
nothing fancy and there is no right or wrong to them. Charlie said the
blue one was his favorite but then said he liked the orange one. I can't
decide myself but I am pretty pleased with how my first attempt came
out. I might cut them out and put them in my Smash journal or maybe use
them in my scrapbooking.


Lacy Day 10: Baby Photos
So, I promise not to turn this challenge into a baby photo bomb, but I broke out the Nikon D5000, an incredible piece of equipment that I am barely qualified to wield, and used manual settings to take this picture of the new arrival. I want to get a good one with his eyes open, but it's hard to find time to grab the camera when he's calm and not needing me to do something for him.


Monday, September 17, 2012
April Day 9: practice
I got caught up watching Season 2 of the Walking Dead and forgot to do my post last night. I didn't take a picture, because honestly it wasn't really much to look at, but I promise I practiced at my crochet today. Nothing fancy just trying to learn the rhythm of it.
Sunday, September 16, 2012
April Day 08
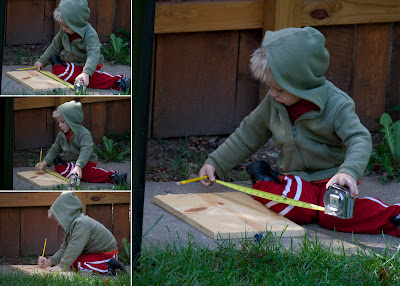
Our little carpenter hard at work. I love getting these candid shots with my telephoto lens.

April Day 07: Pooh's Birthday card
 I am day behind on posting this. I made this card for my dad's birthday
yesterday, took the photo, and then forgot to actually post it. There is
a bit of a story behind the tree. This particular tree that I used on
the card is traced from a tree that decorates my dad's chimney. When my dad was building his log cabin, he decided to have the stone mason incorporate
an image into the stonework of the chimney. I traced it in Illustrator and cut it
out using my Silhouette Cameo. (Have I mentioned how much I love that
machine?) When I first saw it I said, "I just drew a very similar tree at
work for a logo I designed." (If I can find that tree I will post it later) Great minds think alike I guess.
I am day behind on posting this. I made this card for my dad's birthday
yesterday, took the photo, and then forgot to actually post it. There is
a bit of a story behind the tree. This particular tree that I used on
the card is traced from a tree that decorates my dad's chimney. When my dad was building his log cabin, he decided to have the stone mason incorporate
an image into the stonework of the chimney. I traced it in Illustrator and cut it
out using my Silhouette Cameo. (Have I mentioned how much I love that
machine?) When I first saw it I said, "I just drew a very similar tree at
work for a logo I designed." (If I can find that tree I will post it later) Great minds think alike I guess. 
Friday, September 14, 2012
April Day 6: Rabbit Boy

Today I stuffed and put together a rabbit boy while waiting at the Dr.s' office and doing my glucose testing. He still needs stitching shut and needs a mouth and nose. I bought some more socks at Target today too and I am hoping to get a special rabbit made in time for my niece's birthday.
Thursday, September 13, 2012
Lacy Day 5: Souvenir Penny Charm Necklace
So, as you can tell from my first few projects, I like jewelry. I have tons of jewelry-making supplies from projects I've done in the past (including making a couple of tiaras for weddings) but I never use it anymore. I don't have a ton of beads or anything and I'm not one of those people crazy for beading, so I rarely ever make jewelry unless I can't find exactly what I want to buy. Recently, I bought an orange dress to wear to my baby shower and couldn't find the perfect turquoise earrings and necklace set for a reasonable price, so I bought the materials and made them myself.
 I pinned this little gem of a charm bracelet forever ago with the thought that I could go find all of my old souvenir pennies and finally find a use for them. So I raided my old jewelry box at my mom's house and scraped together some older ones from places I visited in college and started collecting more on my recent travels. Now, everywhere I go, I have to squish a penny if I see a machine! And I usually try to find the oldest penny in my purse because, as you can see, the older, all copper pennies turn out better than the newer ones made mostly out of zinc.
So, as my penny collection has been growing, I've had this project in mind for over a year, but haven't ever gotten the energy to do it. So the other night I was ordering chain for the shrinky dink necklaces I'm going to make of the baby's footprints and I decided to go ahead and order some copper chain and findings as well. The chain came in the mail today, so I sat down this afternoon with the drill and it took no time at all to punch holes in all of my pennies. I didn't try to face the right-side up or anything because sometimes there is more empty space on one side or the other, I just did my best to not drill through any of the artwork impression. It also didn't take long to string them onto the chain I bought with the jump rings. Most of the time I spent on this project was in ordering the right parts. Once I had all the materials I needed in hand, it only took about a half an hour to put it all together.


Wednesday, September 12, 2012
April Day 4: Crochet basic training

Lacy Day 4: Family Portrait
I was transferring some family photos onto a new digital picture frame and found some family pictures that my sister- and brother-in-law took on their way to church on Easter of 2005. They didn't have a self-timer on their camera, so they never did get a pic with the entire family in it. I thought they might appreciate having one of everyone together, so I added my sis-in-law into the mix, corrected red eye, and cropped it down to an 8" x 10". I'd like to do some color correction on it, but the resolution is fairly minimal and every time I tried to make an adjustment I just made the artifacting worse, so I decided to let it be.


Tuesday, September 11, 2012
April Day 3: DigiScrap


Lacy Day 3: Sim Card Earrings
Today I was digging around in my jewelry-making craft bin, looking for some beads to make a charm to go on my still unfinished doggie keychain and ran across a couple of SIM cards I'd saved to make earrings out of. Well, no time like the present! I punched a hole in the top of each and made some little charm connectors out of some spare Swarovski crystals I had. Et voila!


Monday, September 10, 2012
Lacy Day 2: Doggie Keychain
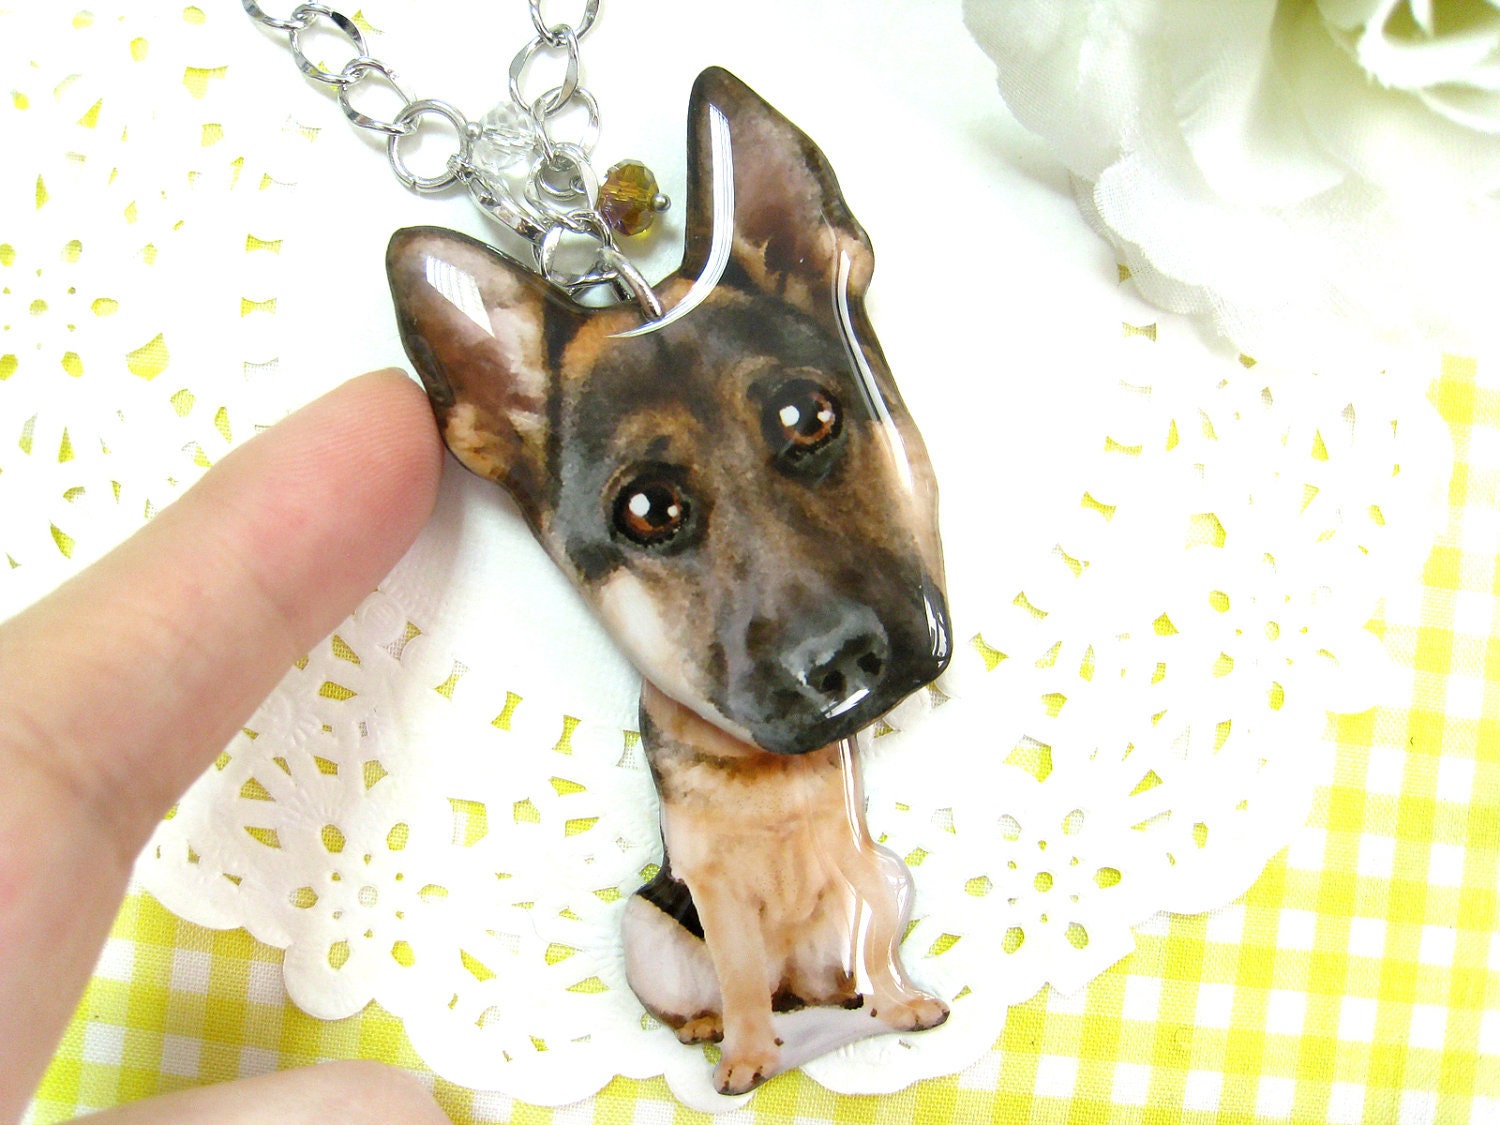

After dinner I sat down in Photoshop and touched up Bart's eyes. I didn't go for the cartoony big eyed look but I did make his head bigger. I printed out two parts, a tiny body and a big head, on cardstock at about 2" tall for a keychain and cut them out. Turns out my photo printer kind of sucks and the print quality wasn't all that good, and I probably should have done some color correcting to remove a bit of the blue from the print, but I got lazy.
I sealed the prints with hairspray so the mod podge wouldn't cause the ink to bleed and let the pieces dry. When I went to coat the pieces with the Mod Podge, I wasn't sure what to expect, but it's some seriously cool stuff. I found that it doesn't run off the edge even of a thin piece of paper as it holds it's surface tension really, really well. If you do happen to get a bubble, simply touch it with a fingertip and it'll come right off on your finger which is a much better place for it than in the center of your project. Failing that, push it to the edge of your shape and draw it off the side. I used the tip of my scissors for this and it worked well, just be careful not to make break the surface tension on the glaze or it will spill off onto your work surface and then you have a problem on your hands.
I'll let the pieces dry overnight, coat the back tomorrow morning, and punch a hole to attach to my keychain and take some pics. I'm afraid the color won't be very nice due to the low quality of the print. Maybe I'll try it again on photo paper tomorrow and see if the image turns out better.
Update from Tuesday morning: I woke up to find that the dimensional magic glaze dried really well, but I had some issues with the method of sealing the ink. I don't think I got enough coats of hair spray. My inks ran and the paper curled a bit. I actually cracked the glaze trying to straighten it out, so I sat this morning and cut out another doggie and decided to try a different method to seal the ink. I'm sure it helps that the print has sat overnight and isn't fresh off the printer, too, but this time I used several coats of clear nails laquer before applying the glaze. I figured the nail glaze would keep the paper stiffer than hairspray so I won't have the warping issue. I'll let it dry today and flip it over and coat the back later and come back for an update.
Update from Tuesday afternoon: Front is completely dry and I'm really happy with the color. No bleeding and everything looks really nice and clear with minimal warping. When I went to flip the pieces over to coat the backs, I had gotten the body piece caught on the paper I had them drying on, so there's a bit of print under the glaze on the back, but meh. It's the back, so who cares. I'm going over to the in-law's for dinner, so when I get home, I'll punch a hole and stick the keyring on. I might even make a little dangling charm to go with it. We'll see.
 Update from Tuesday night: The glaze on the back dried really well and it took no time at all to punch a hole and insert my keyring. There are some minor defects that if I were going to gift this, I'd want a do over to fix, but overall I'm happy with it. For one, I broke the surface tension while waiting for the back of the doggie's head to dry by sticking my stupid finger in the glaze accidentally. This caused the glaze to slip under the ears and glue the piece down to my work surface. As a result, I had to pry the piece up and there are some dull spots on the ears that are a bit unsightly. Also, you'll see some blue streaks in the body of the larger keyring in the pics below. This is where I didn't get a good enough coat of nail laquer under the mod podge and the ink leached. I'll be careful about that if I ever attempt a project like this again. And also, I hear that if you take really hot water, you can dissolve the glaze, so that might be a way to smooth out the dull spots on the ears, but I'd be too afraid I'd get the ink wet if I weren't careful as the edges aren't totally sealed in. And then his little head would be ruined for sure. In any event, I may make a third attempt to achieve perfection at some point.
 In the pic of the finished item below, you'll also see the smaller doggie that was a fail from yesterday.
Day 2 Blast off!


I also did a creative project with Charlie that he was super excited about. We made a little rocket ship from a toilet paper roll and it turned out pretty cute.
Day 1: A Doodle
When I mentioned this idea to Lacy my goals were pretty simple: Spend a mere 10 or 15 minutes a day at least on doing something creative. This could be anything from taking the time to snap a few photos, journaling, scrap booking, sewing, doodling or whatever is even remotely related to a creative project even just laying out the stuff I need to get started on something the next day. Sounds easy enough right? Well for me it hasn't been. I am a stay-at-home mom with a 3 year old and 19 month old boys with a third boy due December 1. I also work at home 15-20 hours a week as a graphic designer for the Harrison County Convention and Visitors Bureau. As you can imagine my days stay pretty busy child rearing, working, and trying to keep up with dishes, diapers, and toys. The routine of things has started to wear on me some lately and I am hoping that adding a little bit of "me" time through creativity back into the mix that I might not feel so crazed all the time.

 My first day was a busy one but I managed a little doodling which is actually something I want to do more of. I found this awesome book that I intend to purchase next week. I think the doodling could go a long way in my scrap booking and my Smash Journal.
 Sunday, September 9, 2012
Lacy Day 1: Shrinky Dinks
Today is the first day of a creativity challenge that my friend April and I have made for ourselves. I am an expecting mom who is planning on staying home to care for our child (due any day now) and need something constructive to do to fill my days since I'm used to working full time and go a little stir crazy when left to my own devices. I joked that instead of a 100 day creativity challenge, I should do a 100 day cleaning challenge instead, but maybe that'll be my next goal.
 Today I chose to do a project making some necklace pendants out of #6 recyclable plastic, an idea I got from a tutorial on Pinterest (where else?)
I saved up a few deli containers from buying farewell cookies for my coworkers last week and could kick myself for tossing out the strawberry container I used this morning. Sigh. Alas, pregnancy brain. I cruised through my jewelry pinboard to get some ideas of things I would find cute enough to wear and came up with a name pendant that I'll later layer with a footprint when the baby comes, a fishbowl, my state and a caged bird.
I sat down in Illustrator and sketched out my designs intending to print them to paper and trace on top of the transparent plastic, but I came up with a better idea. I've previously had great luck feeding plastic through my trusty old Brother laserjet printer (the kind that you find in an office that uses toner, NOT ink) so I took my roughly 6" x 5" sheet of plastic I'd cut out of the top of my food container and put it in the manual feed tray and crowded my art onto the top left of my page. Low and behold, it worked! So, if you have a laserjet printer, give it a try, but don't forget to flop your image so that the "shiny" side of your pendant will face outward and be less likely to get scratched. In Illustrator, choose Output in the print setting dialog and make sure to set the Emulsion setting to "Down (Right Reading)" or manually flop your art using the command Object > Reflect > Vertical before you print. Many consumer printers also have a built in flop option in their print dialog for t-shirt transfers, so I'm sure this step won't pose too much difficulty if you're not using Illustrator.
Some notes on my vector drawing skills: Don't be too impressed. I already had the fish, bird, and state outlines from another project, and I downloaded them from the net and didn't draw them myself. The heart, fishbowl, and cage were easy peasy using simple shapes and the pathfinder palette, the reflect tool to keep things symmetrical, and blended shapes.
I have found that the toner bakes into the finished product really well and will not scratch off, but the colors laid down with a Sharpie will scratch off easily, so if you're adding color, definitely lay a coat of varnish, clear nail polish, or mod podge on the back of your pendant to protect it against wear.
The next few steps were simple. I cut out the pieces and colored in the areas that I wanted to have a little pop with colored Sharpies. I used a 3/8th inch standard hole punch to make a hole at the top of each piece, and used the broad side of my scissors to scratch any of the outline of my cut marks off of the edges of the pieces so the black line would disappear. I had read on another tutorial to expect a 2" object to shrink to .75", so I worked out the ratios and figured that if I wanted my pendants to be 1.5" long, then I would need to size the artwork to print at 3". This ratio was spot on when baking at 250 degrees. However, I can say from the experimentation that I did that if you turn the heat up to say 400 degrees, you will get a significantly smaller finished piece.
So, the pieces that I baked tonight did not turn out very well. They stuck to the tin foil I used as a pan liner and all ended up with little dimples in the centers where they curled around themselves. So I tried again and used a metal spatula to flatten out the pieces when they started to curl. This was a bad idea as the print and shape warped massively when I pressed the pieces down. So, don't do that. Probably just use parchment paper as that seemed to work for the other pinners.
You can see from the pics I've loaded below the dimples and warping in the baked pieces as well as the size differences between the baked and unbaked pieces. The smallest Collin piece may end up being useful. The others are trash. I'll have to step out to the bakery tomorrow and pick up some more goodies so I can use the containers to try to get the rest of them right. I've got plenty of jump beads laying around needing uses, but not many chains, so perhaps a trip to the craft store is in order, also. After all, I have to keep myself busy while I'm waiting on this baby to arrive. I'll be 9 days past due tomorrow and I'm about to lose my mind!


Today I chose to do a project making some necklace pendants out of #6 recyclable plastic, an idea I got from a tutorial on Pinterest (where else?)I saved up a few deli containers from buying farewell cookies for my coworkers last week and could kick myself for tossing out the strawberry container I used this morning. Sigh. Alas, pregnancy brain. I cruised through my jewelry pinboard to get some ideas of things I would find cute enough to wear and came up with a name pendant that I'll later layer with a footprint when the baby comes, a fishbowl, my state and a caged bird.
I sat down in Illustrator and sketched out my designs intending to print them to paper and trace on top of the transparent plastic, but I came up with a better idea. I've previously had great luck feeding plastic through my trusty old Brother laserjet printer (the kind that you find in an office that uses toner, NOT ink) so I took my roughly 6" x 5" sheet of plastic I'd cut out of the top of my food container and put it in the manual feed tray and crowded my art onto the top left of my page. Low and behold, it worked! So, if you have a laserjet printer, give it a try, but don't forget to flop your image so that the "shiny" side of your pendant will face outward and be less likely to get scratched. In Illustrator, choose Output in the print setting dialog and make sure to set the Emulsion setting to "Down (Right Reading)" or manually flop your art using the command Object > Reflect > Vertical before you print. Many consumer printers also have a built in flop option in their print dialog for t-shirt transfers, so I'm sure this step won't pose too much difficulty if you're not using Illustrator.
Some notes on my vector drawing skills: Don't be too impressed. I already had the fish, bird, and state outlines from another project, and I downloaded them from the net and didn't draw them myself. The heart, fishbowl, and cage were easy peasy using simple shapes and the pathfinder palette, the reflect tool to keep things symmetrical, and blended shapes.
I have found that the toner bakes into the finished product really well and will not scratch off, but the colors laid down with a Sharpie will scratch off easily, so if you're adding color, definitely lay a coat of varnish, clear nail polish, or mod podge on the back of your pendant to protect it against wear.
The next few steps were simple. I cut out the pieces and colored in the areas that I wanted to have a little pop with colored Sharpies. I used a 3/8th inch standard hole punch to make a hole at the top of each piece, and used the broad side of my scissors to scratch any of the outline of my cut marks off of the edges of the pieces so the black line would disappear. I had read on another tutorial to expect a 2" object to shrink to .75", so I worked out the ratios and figured that if I wanted my pendants to be 1.5" long, then I would need to size the artwork to print at 3". This ratio was spot on when baking at 250 degrees. However, I can say from the experimentation that I did that if you turn the heat up to say 400 degrees, you will get a significantly smaller finished piece.
So, the pieces that I baked tonight did not turn out very well. They stuck to the tin foil I used as a pan liner and all ended up with little dimples in the centers where they curled around themselves. So I tried again and used a metal spatula to flatten out the pieces when they started to curl. This was a bad idea as the print and shape warped massively when I pressed the pieces down. So, don't do that. Probably just use parchment paper as that seemed to work for the other pinners.
You can see from the pics I've loaded below the dimples and warping in the baked pieces as well as the size differences between the baked and unbaked pieces. The smallest Collin piece may end up being useful. The others are trash. I'll have to step out to the bakery tomorrow and pick up some more goodies so I can use the containers to try to get the rest of them right. I've got plenty of jump beads laying around needing uses, but not many chains, so perhaps a trip to the craft store is in order, also. After all, I have to keep myself busy while I'm waiting on this baby to arrive. I'll be 9 days past due tomorrow and I'm about to lose my mind!


Subscribe to:
Posts (Atom)